- Home
- About
- Training Courses
- ASME Classroom & Virtual Courses
- API Classroom Courses
- E-Learning
- ASME Level 1 eLearning - Full Course
- ASME Plant Inspector Level 1 – Block 1 (Intro and Modules 1 and 2)
- ASME Plant Inspector Level 1 – Block 2 (Modules 3-5)
- ASME Plant Inspector Level 1 – Block 3 (Modules 6-8)
- ASME Plant Inspector Level 1 – Final Examination Module
- ASME Level 2 eLearning - Full Course
- ASME Plant Inspector Level 2 – Block 1 (Modules 1-3)
- ASME Plant Inspector Level 2 – Block 2 (Modules 4-7)
- ASME Plant Inspector Level 2 – Block 3 (Modules 8-10)
- ASME Plant Inspector Level 2 – Final Examination
- API 579 Fitness For Service
- API 571 Corrosion and Materials
- API 577 Welding & Metallurgy
- API 580 Risk Based Inspection
- API 510 CPD Training
- API 570 CPD Training
- API SIFE
- API 1169 Pipeline Inspector Certification Course
- API 936 Refractory Personnel Certification
- Technical Courses
- API CPD Recertification
- Training Courses
- Technical Hub
- Virtual Training
- FAQs
- Contact
- Online Training Portal
- Shop
- Privacy Policy
- In: Training | On: Nov 10, 2021
Fitness For Service – non-uniform metal loss. Part 2 – How to Assess Non-uniform Metal Loss
Fitness For Service – non-uniform metal loss.
This is the second part in our 3-part Fitness For Service series for the assessment of metal loss using API 579 level 1 methodology. It’s best if you read Part 1 of the series first. Part 1 explains the difference between uniform and non-uniform loss, and addresses how to conduct a level 1 uniform metal loss assessment.
In part 2, we will look at how the assessment method changes when the Coefficient of Variation (COV) exceeds 0.1, which really means we have a non-uniform metal loss profile. As in part 1, this will truly only make sense if you have a copy of API 579 to accompany this simplified approach.
As always, it is important to check the acceptability and limitations of the assessment for your component and operating parameters. We will begin this part assuming you have completed those checks and gathered the inspection, design and operating parameters and information.
If you are unsure how to calculate the COV, reread Part 1.
Assessment Procedure Exercise using Critical Thickness Profiles
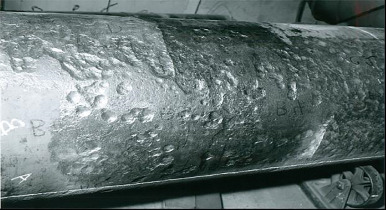
During the inspection of NPS 6 pipework, internal corrosion was noted. The corrosion engineer requested that the area be gridded out and an ultrasonic thickness survey was completed. The results are shown below. Determine if the pipework is suitable for continued operation by carrying out a Part 4 level 1 assessment.
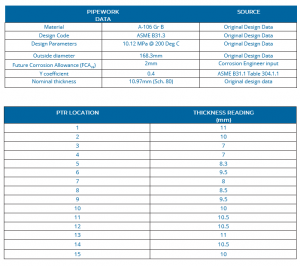
Using the COV calculation from 579, which in reality is the standard deviation divided by the average (see here if you need to know more) we can see in this case that the COV equates to approximately 0.14 (or 14%). By API 579 definition this means the metal loss can be classed as non-uniform, meaning we have a different assessment approach to uniform loss.
We start of at API 579, Part 4, clause 4.4.2 STEP 3.
Assessment Procedure Exercise using Critical Thickness Profiles (CTP)
Calculating the COV we determine that it is greater than 0.1 or 10% and therefore the CTP should be used in lieu of the Point Thickness Readings (PTR). As the item has a COV greater than 10%, the area of loss shall be gridded, ensuring sufficient plane lengths to characterise the metal loss. The thickness readings shall be obtained at intervals along the critical plane, in this case the longitudinal plane. Readings can be obtained at the intersecting grid points to aid the recording of data. It is imperative that the deepest areas of wall loss are measured. Readings shall also be obtained in the circumferential plane.
The results of the ultrasonic inspections are provided below.
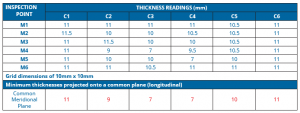
Be careful with the terminology on this assessment, trd refers to the uniform material thickness away from the local metal location and is obtained by thickness measurements. It can be, but is not always the same as tnom.
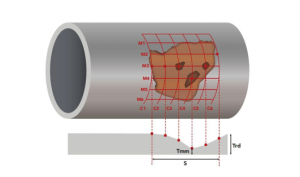
Step 1- Determine Thickness Profile Data
As shown in the example in tables before, the lowest readings at each point along the meridional plane is recorded as a common plane. The minimum thickness (tmm) is also recorded.
Step 2 – Determine the wall thickness and diameter to be used by compensating for future material loss (FCAml)
tml = tnom – FCAml = 10.97 – 2 = 8.97mm
Dml = Dinternal + (2 x FCAml) = 146.36 + (2 x 2) = 150.36mm
Note: tnom is the nominal or furnished finish adjusted for mil tolerance. As the we have measured thicknesses of 11.0mm, the nominal thickness of 10.97mm was used for conservatism.
Step 3 – Compute remaining thickness ratio (Rt)
![]()
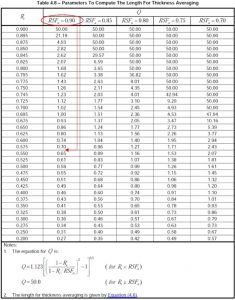
Step 4 -Compute Length for thickness averaging (L) obtaining the value Q, from table 4.8
![]()
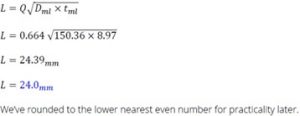
This length (L) limits the distance that we can average the thickness over. It prevents the asseor being under conservative by crediting sound material too far away from the area of metal loss.
When selecting the RSFa value, it’s usual practice to select a value of 0.9.
Interpolation required to accurately find Q where y = Q in the equation below.
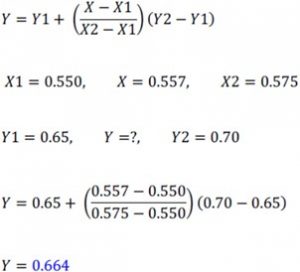
So in this case, Q= 0.664.
Calculating for L,
Step 5 – Determine the average measured thickness in the longitudinal and circumferential CTP based on Length L, ensuring the length is calculated to provide the lowest resulting average reading.
In this case the C2, C3, C4 and C5 readings on the common longitudinal plane are used to calculate the average. The same would be completed for the circumferential plane, but this has been omitted for the purposes of the demonstration.
To establish the average measured thickness it is necessary to use Figure 4.19.
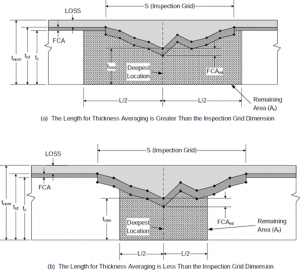
Unfortunately, calculating the tam is not just a case of summing the thicknesses in the length (L) and dividing by the number of readings. API579 specifically states that the average must be the lowest resulting average along the CTP.
The area method is used to determine the average thickness.
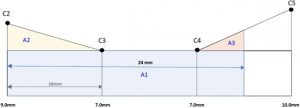
We should see that placing the averaging plane (L) of 24mm to include the lowest four readings that were recorded at the top-left hand corner of boxes; C2, C3, C4 and C5 will provide us with the lowest averaging thickness.
The minimum average thickness is now calculated by summing up the total area and dividing that value by the averaging thickness length. Mathematically as follows:
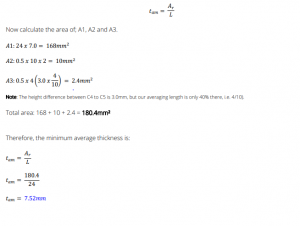
Step 6 – Determine the minimum thickness to resist hoop stress based on internal pressure using the design equation at 2C.5.3. and determine its acceptability using the criteria in table 4.4.
Notice that the piping equations are written in terms of the outside diameter (Do) and therefore do not need to be adjusted for internal metal loss. However, the Do does need to be adjusted when the metal loss has occurred on the external surface as per para 2C.5.2.
We therefore need to calculate minimum thickness using P.
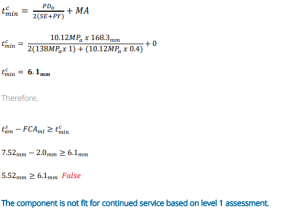
Possible options available are to:
- Re-rate, repair or replace the
- Adjust FCAml
- Conduct a level 2 or 3
Want to find out more about more in-depth FFS training, visit our course page or contact us at [email protected]


